本篇博客是继续对Hyperledger Fabric中的PBFT代码进行解读,重点关注checkpoint机制的实现。
I. 写在前面
A. 前置阅读
本篇博客是建立在之前一些博客的基础上。一切重复的知识介绍,笔者在这篇博客中就不再赘述了。 因此,强烈建议读者先去阅读一下以下这几篇博客。
B. 对TestCheckpoint函数的测试
和博客Fabric中PBFT源码解读(1)中的类似,本篇博客主要介绍pbft-core_test.go中TestCheckpoint函数对PBFT功能的测试。该功能主要指PBFT中的Checkpoint。 TestCheckpoint函数主要分为两部分,第一部分(L297~L330行)是对简单的Checkpoint生成进行测试,第二部分(L332~L361行)测试Water mark对ReqBatch执行的影响。但第二部分的测试代码貌似有点问题。而且整个TestCheckpoint函数中定义的两个WaitGroup类型的变量execWait和finishWait也挺令人费解的。。。。。。
因此,本篇博客主要关注第一部分的测试,并且忽略execWait和finishWait变量。
总体而言,Checkpoint主要会影响1)节点中Water mark的更新和2)集群中View的切换。由于View的切换比较复杂,笔者会专门用一篇博客进行介绍。因此,本篇博客主要介绍Checkpoint生成以及Water mark的更新。
II. 对TestCheckpoint函数运行流程的解读
TestCheckpoint函数的主体代码如下所示: 1
2
3
4
5
6
7
8
9
10
11
12
13
14
15
16
17
18
19
20
21
22// [pbft-core_test.go] TestCheckpoint
func TestCheckpoint(t *testing.T) {
...
validatorCount := 4
config := loadConfig()
config.Set("general.K", 2) // L299
config.Set("general.logmultiplier", 2) // L300
net := makePBFTNetwork(validatorCount, config)
defer net.stop()
execReqBatch := func(tag int64) {
net.pbftEndpoints[0].manager.Queue() <- createPbftReqBatch(tag, uint64(generateBroadcaster(validatorCount)))
net.process()
}
// execWait is 0, and execute will proceed
execReqBatch(1) // L310
execReqBatch(2) // L311
...
net.process()
...
}TestNetwork大同小异,主要的不同包括general.K和general.logmultiplier两个参数的设置,以及对reqBatch的请求发送进行了一个函数封装(也即execReqBatch函数)。
A. Checkpoint和Water mark的概念解释
为解释general.K和general.logmultiplier两个参数,我们首先介绍一下PBTF节点中的日志存储。PBTF中的每一条执行请求都会以日志的形式记录在节点中。但这些日志不能无限增长,必须采用某种方式进行日志的缩减(也即OSDI'99论文中Section 4.3 Garbage Collection中所介绍的)。为实现日志删减,PBFT中定义了Checkpoint的概念,并将在2f+1个节点中都达成了的Checkpoint称为Stable checkpoint。基于Stable checkpoint,PBFT中还定义了Water mark的概念。Water mark可以被看作是一个序列号窗口,包括low-water mark和high-water mark。其中low-water mark为Stable checkpoint中包含的最高的请求序列号。
因此,Water mark随着Checkpoint往前动态推移。同时,Water mark还规定了当前能够被接收执行的请求的序列号。具体而言,由于low-water mark表示了已被Stable checkpoint确认的序列号,因而低于该low-water mark的请求将不予执行。同时,高于high-water mark的请求也将不予执行。下图展示了Checkpoint和Water mark的示意图。PBFT中要求Water mark的大小必须为Checkpoint大小的整数倍。如下图中,Checkpoint的大小为6,Water mark的大小为18。 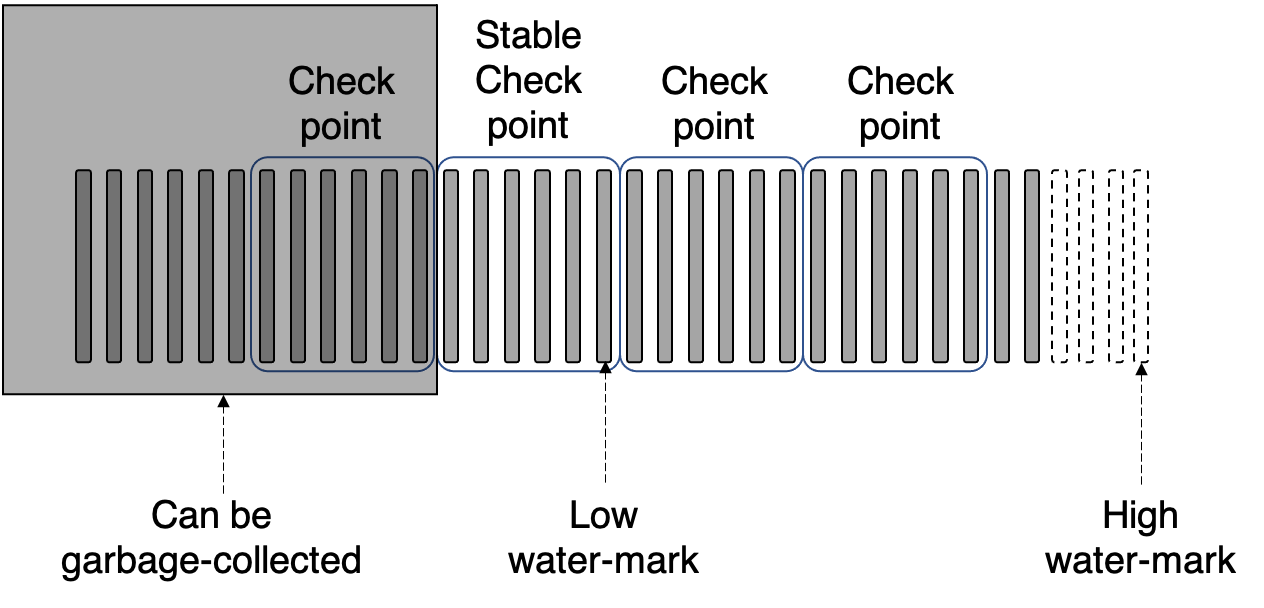
回到TestCheckpoint函数中,general.K定义了Checkpoint的大小,general.logmultiplier定义了Water mark中可容纳的Checkpoint的个数。也即Water mark的大小为general.K*general.logmultiplier。
TestCheckpoint函数在L299行和L300行分别定义了general.K和general.logmultiplier的值为2。也即:每隔两个请求,节点将生成一个Checkpoint。
另一方面,L310行和L311行恰好发起了两个执行请求。因此,预计测试结果中将生成一个Checkpoint。 以下,我们再此回顾请求的执行过程,重点关注函数调用中与Checkpoint和Water mark相关的部分。
B. sendPrePrepare函数中对sequence的检查
回顾之前博客中的内容,L310行中发出的请求将由sendPrePrepare函数接收并处理,该函数及相关函数的代码如下所示: 1
2
3
4
5
6
7
8
9
10
11
12
13
14
15
16// [pbft-core.go] sendPrePrepare
func (instance *pbftCore) sendPrePrepare(reqBatch *RequestBatch, digest string) {
...
if !instance.inWV(instance.view, n) || n > instance.h+instance.L/2 { // L643
...
return
}
}
func (instance *pbftCore) inWV(v uint64, n uint64) bool {
return instance.view == v && instance.inW(n)
}
func (instance *pbftCore) inW(n uint64) bool {
return n-instance.h > 0 && n-instance.h <= instance.L
}sendPrePrepare函数主要在L643行对请求的sequence n进行了两部分检查。
第一部分主要调用了inWV函数,后者又主要调用了inW函数。这里需要提及的事,Fabric对PBFT的具体实现中,只定义了low-water mark的值和Water mark的大小。前者即为instance.h,后者为instance.L。因此,在inW函数中,实际上便对请求的序列号进行了low-water mark和high-water mark的检查。
第二部分的检查对n再次进行了检查。当请求的序列号超过当前water mark的中位值时,也不会发送当前请求。这一点其实是有点让人费解的,我们姑且认为其是做了一个更为保守的检查操作吧。
C. Commit请求时生成Checkpoint
在前面的博客中介绍到:在recvCommit函数中如果判断已经达到了committed的状态,将调用executeOutstanding函数。为唤起读者的记忆,相关代码摘录如下: 1
2
3
4
5
6
7
8// [pbft-core.go] recvCommit
func (instance *pbftCore) recvCommit(commit *Commit) error {
...
if instance.committed(commit.BatchDigest, commit.View, commit.SequenceNumber) {
...
instance.executeOutstanding()
...
}executeOutstanding函数进一步调用pbftCore.executeOne函数、simpleConsumer.execute函数。execute函数中向Event管道中传入了execDoneEvent类型的消息,如下代码所示: 1
2
3
4
5
6
7// [pbft-core_mock_test.go]execute
func (sc *simpleConsumer) execute(seqNo uint64, reqBatch *RequestBatch) {
for _, req := range reqBatch.GetBatch() {
...
go func() { sc.pe.manager.Queue() <- execDoneEvent{} }()
}
}managerImpl.eventLoop函数中被接收,后者接着调用managerImpl.Inject函数、SendEvent函数将该消息传送到pbftCore.ProcessEvent函数中。pbftCore.ProcessEvent函数中的相关代码如下所示: 1
2
3
4
5
6
7
8
9
10// [pbft-core_mock_test.go]execute -> .... -> [pbft-core.go] ProcessEvent
func (instance *pbftCore) ProcessEvent(e events.Event) events.Event {
...
switch et := e.(type) {
...
case execDoneEvent:
instance.execDoneSync() // L386
...
...
}ProcessEvent函数在L386行调用了execDoneSync函数,后者的相关代码如下: 1
2
3
4
5
6
7
8// [pbft-core_mock_test.go]execute -> .... -> [pbft-core.go] ProcessEvent -> execDoneSync
func (instance *pbftCore) execDoneSync() {
if instance.currentExec != nil {
if instance.lastExec%instance.K == 0 { // L996
instance.Checkpoint(instance.lastExec, instance.consumer.getState())
}
} ...
}lastExec是K的整数倍,即被认定为需要进行Checkpoint,从而调用pbftCore.Checkpoint函数。Checkpoint函数的主体代码如下所示: 1
2
3
4
5
6
7
8
9
10
11
12// [pbft-core_mock_test.go]execute -> .... -> [pbft-core.go] ProcessEvent -> execDoneSync -> Checkpoint
func (instance *pbftCore) Checkpoint(seqNo uint64, id []byte) {
...
chkpt := &Checkpoint{ // L980
SequenceNumber: seqNo,
ReplicaId: instance.id,
Id: idAsString,
} // L984
...
instance.recvCheckpoint(chkpt) // L988
instance.innerBroadcast(&Message{Payload: &Message_Checkpoint{Checkpoint: chkpt}}) // L989
}Checkpoint类型的变量chkpt,L988行将该变量发送给了自己,L989行将该变量广播给了其他节点。 这里我们先看innerBroadcast函数。这里的innerBroadcast函数调用和前面博客中的innerBroadcast调用大同小异,最终都将转发到其他节点中的pbftCore.ProcessEvent中来接收。pbftCore.ProcessEvent函数的相关代码如下: 1
2
3
4
5
6
7
8
9// [pbft-core.go] ProcessEvent
func (instance *pbftCore) ProcessEvent(e events.Event) events.Event {
...
switch et := e.(type) {
...
case *Checkpoint:
return instance.recvCheckpoint(et)
...
}ProcessEvent在接收到Checkpoint类型的消息后也是调用了recvCheckpoint函数。以下我们重点来关注recvCheckpoint函数。
D. recvCheckpoint函数的实现细节(1)
recvCheckpoint函数的主体代码如下所示: 1
2
3
4
5
6
7
8// [pbft-core.go] recvCheckpoint
func (instance *pbftCore) recvCheckpoint(chkpt *Checkpoint) events.Event {
...
if instance.weakCheckpointSetOutOfRange(chkpt) {
return nil
}
...
}
recvCheckpoint函数首先调用了weakCheckpointSetOutOfRange函数。后者主要用来判断,当前checkpoint是否超过了high-water mark。并结合已经存储的超过high-water mark的checkpoint个数,来判断当前节点的状态是否确实落后了。我们首先来看一下weakCheckpointSetOutOfRange函数。 1
2
3
4
5
6
7
8
9
10
11
12
13
14
15
16
17
18
19
20
21
22
23
24
25
26
27
28
29
30
31
32
33
34
35// [pbft-core.go] recvCheckpoint -> weakCheckpointSetOutOfRange
func (instance *pbftCore) weakCheckpointSetOutOfRange(chkpt *Checkpoint) bool {
H := instance.h + instance.L
...
if chkpt.SequenceNumber < H { // L1063
...
delete(instance.hChkpts, chkpt.ReplicaId) // L1065
} else {
...
instance.hChkpts[chkpt.ReplicaId] = chkpt.SequenceNumber // L1069
...
if len(instance.hChkpts) >= instance.f+1 { // L1073
chkptSeqNumArray := make([]uint64, len(instance.hChkpts)) // L1074
index := 0
for replicaID, hChkpt := range instance.hChkpts {
chkptSeqNumArray[index] = hChkpt
index++
if hChkpt < H {
delete(instance.hChkpts, replicaID)
}
} // L1082
sort.Sort(sortableUint64Slice(chkptSeqNumArray)) // L1083
...
if m := chkptSeqNumArray[len(chkptSeqNumArray)-(instance.f+1)]; m > H { // L1088
...
instance.moveWatermarks(m) // L1092
...
instance.skipInProgress = true // L1094
...
return true // L1100
}
}
}
return false // L1105
}weakCheckpointSetOutOfRange函数看起来比较复杂,但整体逻辑还是比较简单的。主要分为两个部分:
- 1)L1063行的判断为真时,说明
chkpt中SequenceNumber并未超过high-water mark,当然也就不会得到节点状态确实落后的结论,从而在L1105行返回false。如下所述,只有当超过f+1个节点发来的chkpt都超过了high-water mark,才说明当前节点确实落后了。此外,需要提一下L1065行的操作。L1065行使用了一个hChkpts字段,该字段中主要保存了所有超过high-water mark的checkpoint。因此,当一个节点发来的chkpt中的SequenceNumber并未超过high-water mark时,将尝试对hChkpts字段进行删除更新操作。 - 2)L1063行的判断为假时,将进一步判断:超过
high-water mark的checkpoint数量是否已经超过f+1个。首先在L1069行将当前chkpt保存在hChkpts字段中。L1073行对hChkpts字段中保存的checkpoint数量进行了一个初步判断。L1074至L1082行对hChkpts字段中保存的内容进行了一次重新组织,包括将其中已经小于high-water mark的值删除,并将其余值的hChkpt(其实是SequenceNumber)保存在一个新的chkptSeqNumArray变量中。L1083行对chkptSeqNumArray变量进行了排序。L1088行对chkptSeqNumArray中处于倒数第f+1位置的值进行了判断:判断其是否超过了high-water mark。这里的逻辑是这样的:由于chkptSeqNumArray中的值已经是递增有序的了,当倒数第f+1位置的值都大于high-water mark,则说明其中至少有f+1个位置的值都大于high-water mark。
乍一看可能会觉得L1074至L1088行的代码有些冗余:不就相当于在删除了小于high-water mark的checkpoint后又判断了一次这些checkpoint的数目嘛。其实这段代码还有一个很重要的作用,就是找到倒数第f+1个checkpoint的SequenceNumber值,也即m。该m在L1092行用于更新Water mark。
剩下来的就比较简单了,在L1092行对Water mark进行了更新,在L1094行将skipInProgress变量设置为true,并返回true。 先说一下skipInProgress变量,其主要被用来作为状态同步的依据。当该值为true时,节点将在后面进行状态同步。
下面再来看一下L1092行的moveWatermarks函数,其函数主体如下所示: 1
2
3
4
5
6
7
8
9// [pbft-core.go] recvCheckpoint -> weakCheckpointSetOutOfRange -> moveWatermarks
func (instance *pbftCore) moveWatermarks(n uint64) {
// round down n to previous low watermark
h := n / instance.K * instance.K // L1010
...
instance.h = h // L1049
...
instance.resubmitRequestBatches() // L1054
}moveWatermarks函数主要干了四件事:
- 计算出新的
low-water mark。L1010行乍一看是行没用的代码,但其中实现了一些巧妙的运算。由于我们传入的n是某一个Checkpoint中的最大SequenceNumber。该SequenceNumber一般可以表示为instance.K*m+(instance.K-1)的形式。通过L1010行的计算,得到instance.K*m,该值即为该checkpoint的low-water mark。举例来说,假设instance.K为6,Checkpoint中包含的SequenceNumber区间将可能是[0, 5], [6, 11], [12, 17] ...对于[12, 17]的Checkpoint,其传入的n为17,经过L1010行的计算17/6*6得到值12,即为该Checkpoint的low-water mark. - 删除小于新的
low-water mark的数据。由于这些代码比较长(从L1011行到L1048行),考虑到篇幅,笔者没有在上面代码中列出。这些删除操作包括删除certStore、checkpointStore、pset、qset、chkpts中存储的各种数据。 - 更新节点的
low-water mark。L1049实现了该操作。 - 重新提交被积压的请求。如L1054行所示。
E. recvCheckpoint函数的实现细节(2)
重新回到recvCheckpoint函数,相关代码如下所示: 1
2
3
4
5
6
7
8
9
10
11
12
13
14
15
16
17
18
19
20
21
22
23
24
25
26
27
28
29
30
31
32
33
34
35
36
37
38
39
40
41
42
43
44
45
46
47
48
49
50
51
52
53
54
55
56
57
58
59
60// [pbft-core.go] recvCheckpoint
func (instance *pbftCore) recvCheckpoint(chkpt *Checkpoint) events.Event {
...
if instance.weakCheckpointSetOutOfRange(chkpt) { // L1147
return nil // L1148
}
if !instance.inW(chkpt.SequenceNumber) { // L1151
...
return nil
}
instance.checkpointStore[*chkpt] = true // L1161
...
diffValues := make(map[string]struct{}) // L1164
diffValues[chkpt.Id] = struct{}{}
matching := 0
for testChkpt := range instance.checkpointStore {
if testChkpt.SequenceNumber == chkpt.SequenceNumber {
if testChkpt.Id == chkpt.Id {
matching++
} else {
if _, ok := diffValues[testChkpt.Id]; !ok {
diffValues[testChkpt.Id] = struct{}{}
}
}
}
} // L1178
...
if count := len(diffValues); count > instance.f+1 { // L1183
logger.Panicf("...")
}
if matching == instance.f+1 { // L1188
...
instance.witnessCheckpointWeakCert(chkpt) // L1197
} // L1198
if matching < instance.intersectionQuorum() { // L1200
return nil
}
...
if _, ok := instance.chkpts[chkpt.SequenceNumber]; !ok { // L1213
...
if instance.skipInProgress { // L1216
logSafetyBound := instance.h + instance.L/2
...
if chkpt.SequenceNumber >= logSafetyBound { // L1220
...
instance.moveWatermarks(chkpt.SequenceNumber) // L1222
}
}
return nil
}
...
instance.moveWatermarks(chkpt.SequenceNumber) // L1231
return instance.processNewView() // L1233
}weakCheckpointSetOutOfRange函数返回为true,说明当前节点的数据状态落后太多了,需要首先进行状态同步。也就没有必要再进行这一次的Checkpoint的操作了,直接在L1148行返回。 以下介绍weakCheckpointSetOutOfRange函数返回为false的情形。
- L1151行对当前
chkpt的SequenceNumber进行了检查,如果不在watermark范围内,则直接返回。 - L1161行将接收到的
Checkpoint存储到checkpointStore中。checkpointStore中存储了所有接收到的Checkpoint。 - 接下来的L1164到L1178行基于
checkpointStore变量,构建了两个新变量diffValues和matching。其中matching变量统计了和当前chkpt的SequenceNumber和Id都相同的checkpoint的数量,diffValues变量保存了和当前chkpt的SequenceNumber相同但Id不同的Checkpoint的Id值。 - L1183行对
diffValues进行了检查。如果diffValues中保存的Id数量超过f+1个,说明和chkpt的SequenceNumber及Id都相同的checkpoint的数量最多不超过2f个,因而chkpt永远不可能成为stable checkpoint。更重要的是,一般而言:SequenceNumber相同的Checkpoint对应的Id(Id表示一个节点当前的数据状态)应该也是相同的。这里有超过f+1个Checkpoint的Id(也即数据状态)不同,其中至少有一个诚实节点和当前节点的数据状态不同,说明集群中出现了问题,因此直接采用panic函数报错。 - L1188行判断
matching值是否为f+1。若是,则调用witnessCheckpointWeakCert函数。witnessCheckpointWeakCert函数主要是用来辅助节点的状态更新的。因此,整体L1188至L1198行的逻辑是这样的:当当前节点收到f+1个具有相同SequenceNumber和Id的Checkpoint时,该Checkpoint大概率代表了一个稳定的数据状态,调用witnessCheckpointWeakCert函数尝试将当前节点的状态更新到该数据状态。笔者这里思考过一个问题:为什么是判断等于f+1,而不是大于等于f+1。笔者的理解是:对witnessCheckpointWeakCert函数的调用一次就够了,没必要在大于等于f+1的每次都调用该函数。 - L1200行对
matching值再次进行了判断。若未达到Quorum(即2f+1),则说明chkpt对应的Checkpoint未达到稳定,直接返回;否则,说明chkpt对应的Checkpoint达到稳定,继续下面的运行。 - L1213行对
chkpt再次进行了检查。首先,我们需要解释一下instance.chkpts和instance.checkpointStore两个字段的不同。前者存储的是节点自己生成的Checkpoint,后者存储的是接收到的Checkpoint(也包含了自己发送给自己的)。因此,后者是前者的超集。另一方面,即使chkpt对应的Checkpoint已经满足了Stable的要求,其收到的2f+1个Checkpoint可能全部是从别的节点接收到的。也即出现L1213行中判断ok值为false的情况。在此情况下,往往说明当前节点的数据状态落后于其他节点了。 代码在此处做了一个小优化。既然当前节点的数据状态已经落后了,如果当前节点正好处于数据同步的过程中(即L1216行instance.skipInProgress值为true),并且chkpt的SequenceNumber超过了当前Water mark的中位值(即L1220行),那就直接更新Water mark值到这个中位值(即L1222行)。更新Water mark值的目的在于:当当前轮次的状态同步过程结束后,会再次检查Water mark,若Water mark中的low-water mark仍然高于当前更新轮次的seqNo,则开启新一轮的状态同步。这样的优化加速了状态同步的进程。 关于“状态数据的同步”,笔者将在后面专门用一篇博客进行介绍。 - 代码执行到L1231行的话,说明:
chkpt已经达到了稳定条件(即:接收到超过2f+1个Checkpoint消息),并且该节点自己也生成了其对应的Checkpoint。那么,就可以直接更新Water mark了。 - L1233行调用
processNewView进行View切换相关的处理。关于View切换,笔者在后面也会再写一篇博客进行介绍。
III. 小结
本篇博客主要介绍了Fabric中的PBFT是如何生成Checkpoint的,以及在达到Stable Checkpoint时,如何更新节点的Water mark。 此外,跟Checkpoint最相关的另一个机制是View的切换,这一点我们将在后面的博客中进行介绍。